Overview
The Home screen is your starting point in the app, showing all nearby outlets based on your current location. From here, you can quickly search, filter, and view outlet details, as well as access other features using the navigation bar at the bottom.
Layout
Below is the Home screen with key sections visually marked. Each area is designed to help you navigate and interact with the app efficiently
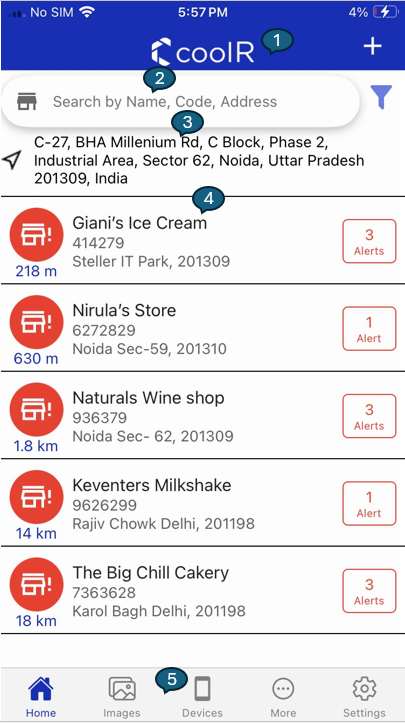
1. Header
The header sits at the top of the screen with application theme match and include the logo and add outlet functioanlity.

1. Logo
The coolR logo is centered at the top, representing the app’s brand and providing a familiar starting point for users.
2. Add Location
The "+" icon on the right side of the header allows you to quickly add a new outlet. Tapping this icon takes you to the Add Location screen, where you can enter details such as the outlet name, address, and other relevant information. This feature streamlines the process of expanding your outlet list, making it easy to keep your records up to date. After saving, the new outlet will appear in your Home screen list, ready for further management or monitoring.
2. Search Bar
The Search Bar helps you quickly find outlets, assets, or smart devices using flexible filters and intuitive icons.

1. Dynamic Icon
The icon at the start of the search bar changes based on the selected filter:
- Outlet: Displays the outlet icon when searching by location.
- Asset: Shows the asset icon when searching for assets.
- Smart Device: Shows the smart device icon when searching for smart devices.
This visual cue helps you instantly recognize the current search mode.
2. Search Field
The search field allows you to enter a name, code, or address to find specific items. The search adapts to the selected filter:
- When Outlet is selected, you can search by outlet name, code, or address.
- When Asset is selected, you can search by asset serial.
- When Smart Device is selected, you can search by device serial.
The placeholder text and icon update automatically to match your chosen filter, making it clear what you are searching for.
3. Filter Section
In addition to the existing filters (Outlet, Asset, Smart Device), new advanced filters have been introduced to improve data visibility and control.
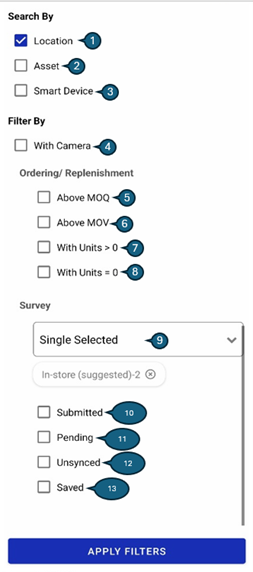
| # | Filter / Option | Description |
|---|---|---|
| 1 | Location | We can search for location based on name, code, address default. |
| 2 | Asset | We can search for location based on asset serial. |
| 3 | Smart Device | We can search for location based on camera serial. |
| 4 | With Camera | Displays only assets that have an assigned camera. |
| 5 | Above MOQ (Minimum Order Quantity) | Shows locations where the order case size is greater than or equal to the MOQ. |
| 6 | Above MOV (Minimum Order Value) | Displays records where the order value is greater than or equal to the MOV. |
| 7 | With Units > 0 | Shows records with order case size greater than zero. |
| 8 | With Units = 0 | Displays records where the order case size is zero. |
| 9 | Survey Dropdown | Displays only those outlets that have same selected survey type. |
| 10 | Submitted | Displays only those outlets that have submitted survey. |
| 11 | Pending | Displays only those outlets that have pending survey. |
| 12 | Unsynced | Displays only those outlets that survey is submitted in Offline mode or poor network range. |
| 13 | Saved | Displays only those outlets that have started survey but not submitted yet. |
4. Sorting
The Sorting feature on the Home screen allows users to organize the outlet list based on different parameters for better visibility. How Sorting Works:
- On the Home screen, tap the Sort icon to open sorting options.
- Once an option is selected, the list is sorted in ascending order by default.
- Sorting is applied immediately to the outlet list. Available Sorting Options: Users can sort the outlet list using the following options:

| # | Sort Option | Description |
|---|---|---|
| 1 | Distance | Sorts outlets based on their distance from the user’s current location. Order: Ascending (nearest to farthest). |
| 2 | Code | Sorts outlets by Outlet Code. Order: Ascending (alphanumeric). |
| 3 | Name | Sorts outlets by Outlet Name. Order: Ascending (A–Z). |
| 4 | Order Quantity | Sorts outlets by total order units. Order: Descending (highest to lowest). |
| 5 | Order Value | Sorts outlets by total order value. Order: Decending (highest to lowest). |
3. Current Address
The Current Address section shows your real-time location or address at the top of the Home screen. The app uses this information to display outlets that are closest to you, ensuring the list remains relevant as you move. If your location changes, the outlet list updates automatically to reflect nearby options. This feature helps you quickly find and manage outlets based on where you are, making your workflow more efficient and location-aware.

4. Location List
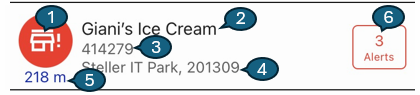
The Location List is the main body of the Home screen, presenting a scrollable list of nearby outlets. Each entry provides key information at a glance:
1. Avatar Icon
A visual indicator representing the outlet or device status:
- Red with exclamation mark: Open alerts present
- Gray camera: No device assigned
- Green camera: Device assigned with no open alerts
2. Outlet Name
Clearly displays the outlet’s name for quick recognition.
3. Outlet Code
A unique identifier assigned to each outlet.
4. Address
Shows the full address of the outlet for reference.
5. Distance
Indicates the outlet’s distance from your current location (in miles or kilometers).
6. Open Alerts
Displays the number of open alerts associated with the outlet. If alerts are present, a badge appears on the right, helping users quickly identify and prioritize those outlets requiring immediate attention.
7. Pending icon
Indicates pending survey on this outlet.
8. Submitted icon
Indicates submitted survey on this outlet.
9. Unscyced icon
Indicates survey is submitted in Offline mode or poor network range.
10. Saved icon
Indicates that the survey was submitted in offline mode or under poor network conditions.