Picture to Planogram — Quick Guide
This guide explains how to use the Picture to Planogram feature in the CoolR mobile app to create and assign a planogram (shelf layout) from a photo taken during installation.
What is Picture to Planogram?
Picture to Planogram lets you generate a planogram automatically from a chiller/cooler photo. The app attempts to detect shelves and products, map SKUs, and create a planogram that can be assigned to the asset.
When to use this feature
- When installing a new asset.
- If the asset has no planogram assigned.
- When you need a quick planogram created from a chiller/cooler photo.
Before you start
Ensure the following before capturing images:
- Internet connectivity is available (required for product recognition).
- The app has camera permission.
- Your user account has the necessary permissions for installation and planogram creation.
Steps to create a planogram
- Open the CoolR mobile app and select the Outlet.
- Open the Outlet details and locate the target asset (chiller/cooler).
- Start the installation flow for the asset.
- Choose the planogram creation option:
- From Camera — take a photo of the chiller/cooler.
- From Gallery — upload an existing photo.
- Skip — (if you do not want to create a planogram now).
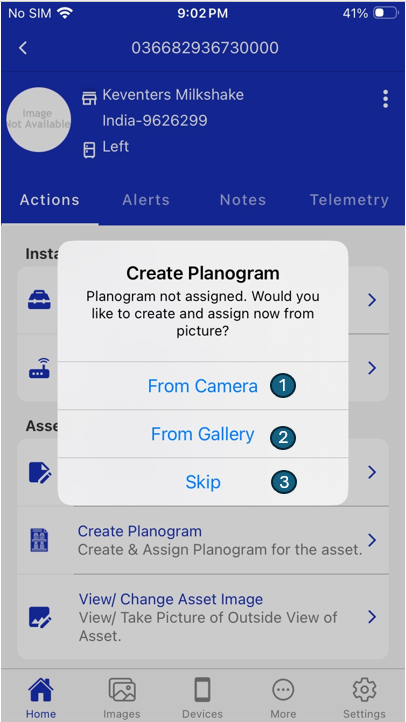
You can also create a planogram from Action List > Create Planogram.
Review recognition results
When the recognition completes the app will attempt to:
- Auto-create shelves based on detected shelf lines (e.g., 6 shelves detected → 6 shelves created).
- Detect products and map them to shelves.
- Mark shelves as empty if no products are detected.
You can then edit the generated planogram:
- Add shelves.
- Add products.
- Adjust the stacking and facing of products.
- View the stacking count.
- Remove shelves.
- Review and configure replenishment details, if applicable.
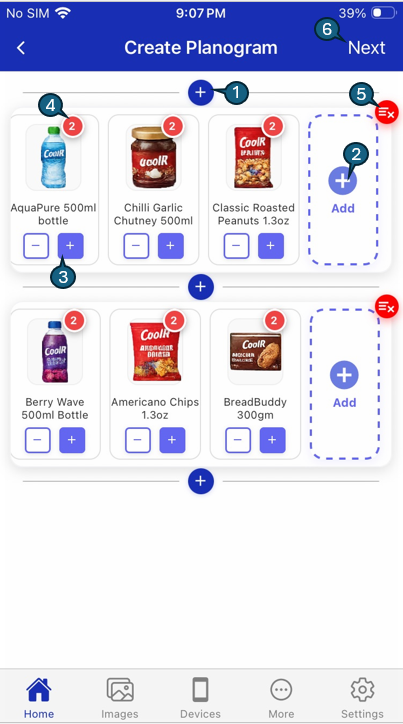
Add or Remove Product
- Tap the + (Add) button to add a new product.
- Tap an existing product thumbnail to remove or replace it.
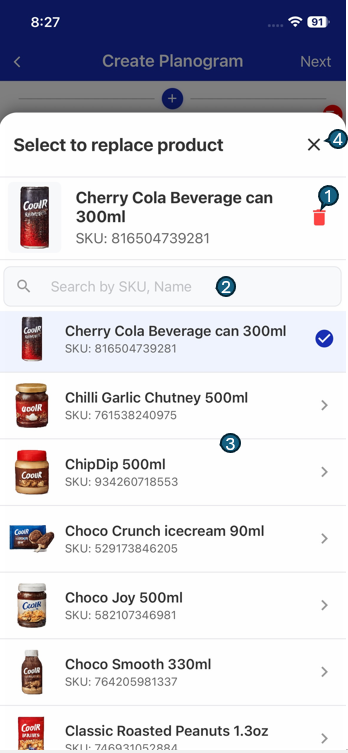
When adding a product:
- Remove or replace the current product.
- Search by SKU code or product name.
- Select from the product list to verify.
- Confirm to close the product list and apply changes.
If recognition fails or results are incomplete, try the following:
- Re-capture the image ensuring the full shelf is visible, lighting is adequate, and the camera is steady.
- Take a closer photo or try a different angle if products are partially obstructed.
Planogram Summary
If replenishment is enabled, you can review and edit replenishment details from the planogram summary screen:
- Adjust the number of facings.
- Choose the correct case size.
- View the stacking count configured for each product.
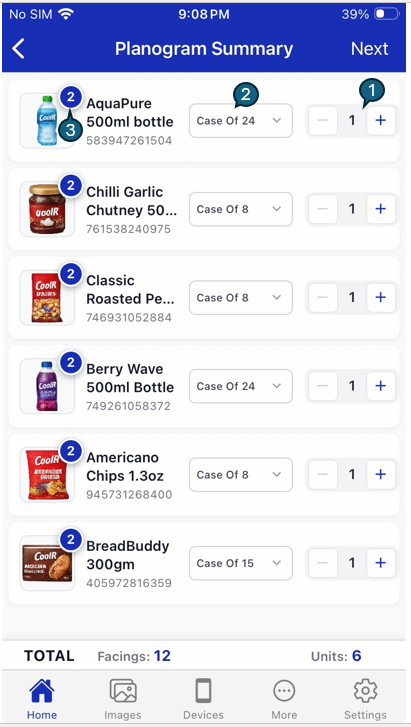
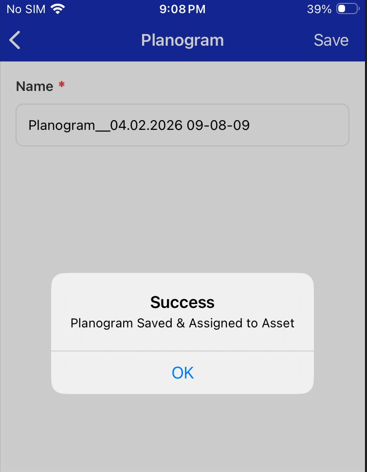
Clicking Next gives you the option to edit the Planogram Name.

Save and assign
- Tap Save to generate the planogram.
- The planogram will be assigned to the asset. Once assigned, the Create Planogram option will not appear for that asset unless it is unassigned.
Important rules
- Every shelf included in the planogram should contain at least one product. If a shelf is empty, either add products or remove the shelf from the planogram.
- Planogram names must be unique. If the chosen name already exists, select a different name.
- For double door or multi-door coolers, take separate shelf images for each door so that individual planograms can be generated through image recognition.
Offline handling
If the device is offline, the app will display a "No Internet connection" message and provide options to go back or retry recognition once connectivity is restored.
Best practices for better recognition
- Use good, even lighting (avoid strong backlighting or glare).
- Ensure the full shelf/chiller/cooler is visible in the photo.
- Hold the camera steady to avoid blur.
- Position yourself roughly perpendicular to the shelf (stand straight in front).
- Minimize reflections and remove obstructions when possible.