Add Asset
The Add Asset screen is designed to help users (such as Sales Rep and warehouse staff) quickly register new cabinets or other assets into the system.
This screen presents a clean layout where users can enter key details such as the Asset serial number, select the Asset type, and optionally provide additional information through other fields.
Asset Details (Grouped)
The following grouped sections break the asset metadata into logical categories to make data entry clearer and easier to maintain. Use the tables below to understand each field (Element) and a short Description for when to use it.
General Information
This category contains basic identity and location information that describes the asset and how it relates to the client and store.
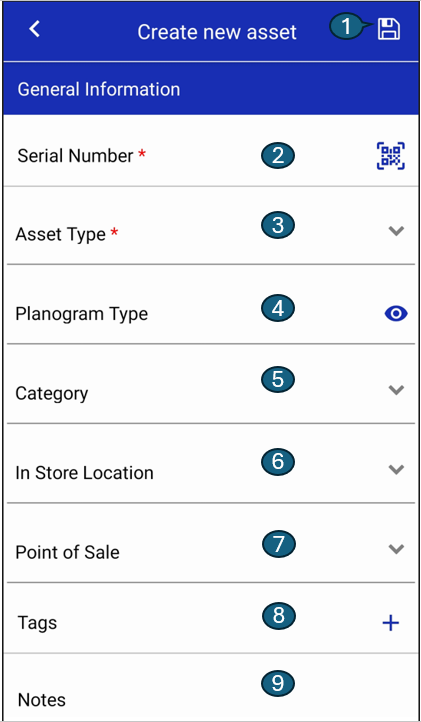
| # | Element | Description |
|---|---|---|
| 1 | Save Button | To save the Asset details after make madifications. |
| 2 | Serial Number | The unique manufacturer serial number for the asset. Often scanned from the device QR/barcode. |
| 3 | Asset Type | Name of the asset type/ model - Unique (Generally a combination of manufacturer & model) |
| 4 | Planogram | The associated planogram template or identifier that describes expected product layout. |
| 5 | Category | Business category or product grouping for reporting (e.g., Beverage, Frozen Food, Ice Cream). |
| 6 | In Store Location | The physical placement inside the store (e.g., Aisle, Backstorage, Checkout, Store Entry etc.). |
| 7 | Point of Sale | Identifier for the POS location or terminal the asset is associated with, if applicable. (First, Second, Third etc.) |
| 8 | Tags | Free-text tags that can be entered to provide additional context or categorization. |
| 9 | Notes | Free-form notes or comments related to the asset, such as installation details or special instructions. |
Asset Tracking
Use these fields to track the asset lifecycle, geolocation and any movement thresholds used for monitoring.
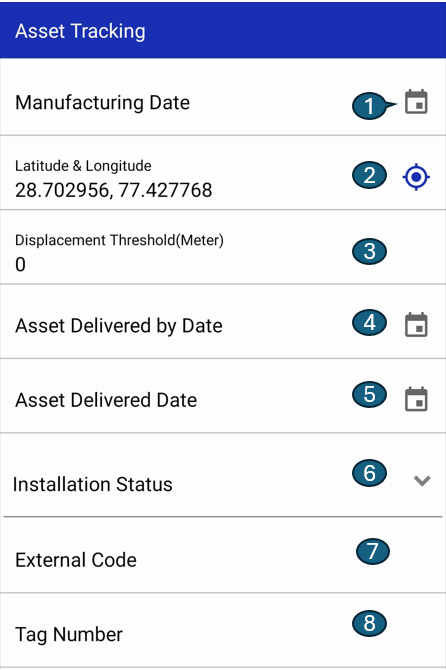
| # | Element | Description |
|---|---|---|
| 1 | Manufacturing Date | The date the asset was manufactured. Useful for warranty and lifecycle calculations. |
| 2 | Latitude/Longitude | The geographic coordinates of the asset’s installed location. The GPS icon can be tapped to refresh and retrieve the latest coordinates based on the current GPS location |
| 3 | Displacement Threshold (units) | The allowed movement tolerance before generating an alert (specify units, e.g., metres). |
| 4 | Asset Delivered by Date | The expected or promised delivery date for the asset (planned date). |
| 5 | Asset Delivered Date | The actual date the asset was delivered to the site. |
| 6 | Installation Status | Current installation state (e.g., Pending, In Progress, Installed, Failed). |
| 7 | External Code | Any external or vendor code/reference associated with the asset (third‑party identifiers). |
| 9 | Tag Number | Physical tag or RFID number applied to the asset for on-site identification. |
Image Settings
Control how images captured for this asset are handled by the system.
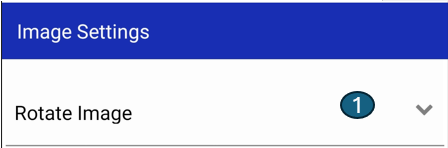
| # | Element | Description |
|---|---|---|
| 1 | Rotate Image | Options to rotate captured images automatically to the correct orientation. Leave this blank to apply the orientation settings from the system configuration. |
Retrofit
Fields used when an existing location or legacy asset is retrofitted with a new device.
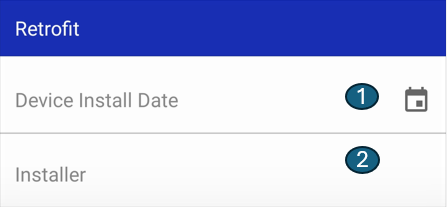
| # | Element | Description |
|---|---|---|
| 1 | Device Install Date | The date the device was physically installed at the location. This is read-only field. |
| 2 | Installer | Name or identifier of the technician or company who performed the installation. |
Notes
- Asset serial and Asset type are mandatory rest fields are optional.
- Planogram helps define the expected product arrangement inside the cabinet.
- The "eye" icon can be used to view or toggle the full planogram input.