
Appearance
Configuration: set up the master data and settings behind Playbook
The Configuration menu holds the data that every other Playbook screen relies on: your cooler models, coolers, devices, outlets, planograms, products and users, plus organization-wide settings. This page explains the setup order and how to import and export data in bulk. Each screen has its own page.
Configuration at a glance
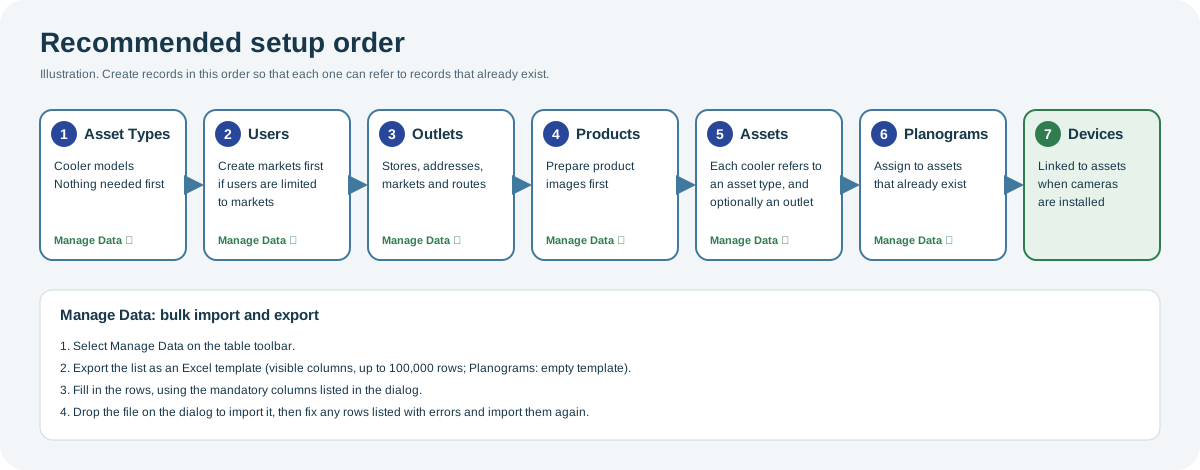
Open the full-size setup order diagram.
When to use it
Use these screens when you onboard a new organization or market, when you add or change outlets, coolers, products or users, or when you change organization-wide settings such as currency or time zone.
Who uses it
| Role | Typical use |
|---|---|
| Organization administrators | Maintain users, outlets, assets and settings. |
| Category and merchandising managers | Maintain products and planograms. |
| Deployment teams | Prepare asset types, assets and devices before installation. |
Why it helps
- One source of truth: outlets, coolers and products entered here appear on every Playbook screen and report.
- Bulk changes: import hundreds of records from Excel instead of entering them one at a time.
- Clean reporting: correct markets, channels and planograms make filters and KPIs reliable.
Where to find it
Open Configuration in the menu. Your role determines which screens you see and whether you can add or change records.
| Group | Screens |
|---|---|
| Master data | Asset Types, Assets, Devices, Outlets, Planograms, Products, Recognition Families, Users |
| Settings | System |
How it works
Setup order
Some records refer to others, so create them in this order:
- Asset Types: the cooler models. Nothing needs to exist first.
- Users: if you will limit users to markets, create the markets first.
- Outlets: the stores where coolers are placed.
- Products: prepare product images first; image recognition needs them.
- Assets: each cooler refers to an asset type and, optionally, an outlet and a planogram.
- Planograms: create the assets first, then assign planograms to them.
- Devices: cameras are linked to assets when they are installed.
Manage Data: import and export
The Asset Types, Assets, Outlets, Planograms, Products and Users screens have a Manage Data button on the table toolbar.
- Select Manage Data.
- Select Export to download the current list as an Excel file with the columns that are visible in the table. Use this file as your import template. For Planograms, export downloads an empty template. Export is limited to 100,000 rows.
- Fill in or update the rows. The dialog lists the mandatory columns for the screen and the steps to complete before and after import.
- To import the file, drag it onto the dialog or select it.
- Check the result: the number of records processed and, for each row that failed, the row number, error type and message. Fix those rows and import them again.
To import, your role needs permission to add master data.
Why you might not see something
- A screen is missing from the menu: your role does not include it.
- There is no add button or no Manage Data import: your role can view but not change that data.
- "Export limit exceeded": filter the table to fewer than 100,000 rows.
- "Export columns hidden": show at least one column, then export again.
Tips
- Import in the setup order above, so each file refers only to records that already exist.
- Export first and use the exported file as your template, so the column names match.
Related pages
Last updated: November 13, 2026. Screens and options vary with your role and your organization's setup.