
Appearance
Outlet Actions: track planned work at outlets
The Outlet Actions screen (Tasks > Outlet Actions) lists the work planned at outlets, such as a cooler installation or a maintenance check. Each action has a type, a planned date, an assigned user and a completion date. Playbook works out its status from those dates.
Outlet Actions at a glance
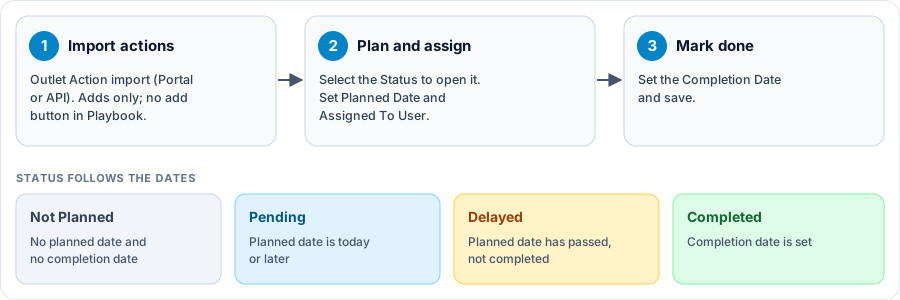
Open the full-size Outlet Actions diagram.
When to use it
- To see which outlet actions are pending or delayed.
- To schedule an action, assign it to a user, or mark it done.
Who uses it
| Role | Typical use |
|---|---|
| Operations and account teams | Plan outlet work and follow up on delayed actions. |
| Client administrators | Assign actions to their users and record completion. |
Why it helps
- Status at a glance: delayed and pending actions stand out without checking dates by hand.
- Clear ownership: each action names the user responsible for it.
Where to find it
Select Tasks > Outlet Actions in the menu. Your role needs the Tasks menu and the Outlet Actions screen. You see the actions for the client you are signed in to.
How it works
Where actions come from
You cannot add actions on this screen. They are created in bulk with the Outlet Action import, from the CoolR Portal (Outlet Management > Outlet Actions > Import) or the import API. See Outlet Action Import. The import only adds actions; it never updates existing ones.
Status
| Status | When |
|---|---|
| Completed | A completion date is set. |
| Not Planned | No planned date and no completion date. |
| Pending | Not completed, and the planned date is today or later. |
| Delayed | Not completed, and the planned date has passed. |
Status is calculated, so you change it by changing the dates. Dates are compared in UTC.
Using the screen
The table shows each action's outlet (code, name and address), Planned Date, Completion Date, Assigned To User, Status, Outlet Action type and Client. The newest planned dates come first.
To update an action:
- Select its Status.
- Set the Planned Date and Assigned To User. The user list shows your organization's users.
- When the work is done, set the Completion Date.
- Save.
Why you might not see something
- The screen is not in your menu: your role does not include Tasks or the Outlet Actions screen.
- There is no add button: actions are created only through the import.
- An action is missing: it belongs to another client, or a table filter hides it.
Tips
- Filter Status on Delayed to see overdue work first.
- Set a planned date on every action; without one it stays Not Planned and never shows as delayed.
Related pages
Last updated: November 19, 2026. Screens and options vary with your role and your organization's setup.